Various questions are raised by both musicians and guitar enthusiasts concerning the use of the golpeador or other protective plates. The following article is our attempt to help both beginners and more advanced musicians who may be experimenting with various musical styles better understand the intricacies of them and their historic evolution. We also included a step by step installation guide for the guitarists who decide to fit a self adhesive golpeador on their instruments.
What is a golpeador?
A golpeador (from the Spanish word golpe = tap) in its modern form is a plastic film, usually self-adhesive which is fitted on the guitar soundboard in order to prevent damage from the guitarist’s right hand when executing techniques such as ”golpe”.
Flamenco guitar players often tap the guitar soundboard and use the guitar body like a percussion instrument to produce different percussive sounds. This technique is adopted as an expressive means by guitarists of various other styles and different origins.
The guitar soundboard is of course very sensitive, made from soft woods such as cedar and spruce. The finish on the guitar, especially in the case of shellac, is not adequate and cannot withstand the wear from the guitarist’s right hand, hence the need for the golpeador.
Is there a difference between a golpeador and a pickguard?
Both the golpeador and the pickguard are protective surfaces serving the same purpose, to prevent damage on the guitar either from the nails or the pick. On steel string guitars we use the term pickguard as these instruments were mostly played using a pick.
On nylon string guitars, that are mostly played using fingerstyle technique, we use the term golpeador. Of course, between the two, we notice various differences. Different shapes and sizes are used following the function and aesthetics of the respective instrument they are used on.
The way they are integrated into the guitar body is quite different too. The pickguard on some electric guitars often serves as a base for the pickups and other electronic parts of the instrument (the famous Fender Stratocaster is such an electric guitar), whereas on a flamenco or classical guitar the golpeador is installed using the most unobtrusive way usually in the form of a transparent, self adhesive film.

Is the Goldpeador removable?
On a frequent basis it would be impractical. It is quite an involving process to remove and refit the golpeador on a normal guitar. Of course, you can replace it after a long period of use (usually after several years) when it is damaged and doesn’t protect the guitar adequately anymore.
Historia de un… golpeador
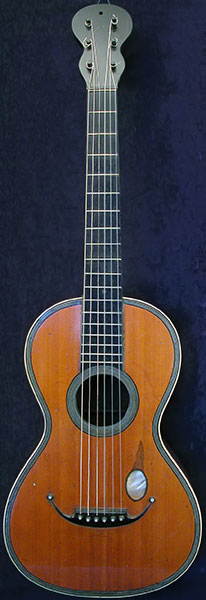
It is safe to assume that various protective plates similar to the golpeador accompanied the classical or flamenco guitar during the 19th century. They are also present on romantic guitars, like the guitar made by Aubry Maire from around 1820 pictured below. In this case, the finger rest, made from mother of pearl, was used as a basis for the guitarist’s little finger for added stability. A technique quite popular at the time.
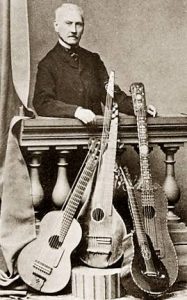
Another example would be the heptacorde made by René Lacôte in 1855, modified by Coste, an instrument very similar to the heptacorde Coste performed on. Here, the protective plate is made from wood.

A similar protective plate can also be observed on the infamous papier-mâché guitar made by Torres in 1862. The luthier wanted to demonstrate the importance of a fan braced soundboard and its contribution to the final sound of the instrument.

For the needs of the flamenco guitar performers, the protective plate grows larger and covers the area of the soundboard above the bass strings.

Following the development of new materials it was only natural for the golpeador to evolve into its modern form. Nowdays, the golpeador or pickguard is usually made from polymers, a material far more resilient and long lasting than wood.
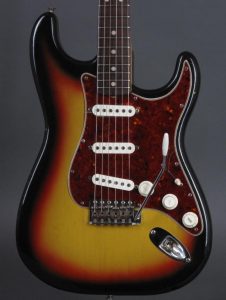
Often times we see man made imitations of tortoiseshell and mother of pearl in an attempt to preserve the traditional look of the instruments. Fender never actually used real tortoiseshell for their pickguards. When tortoise pickguards where introduced by the company in 1959 they were made from celluloid.
The need for expressive freedom and portability in today’s fast-moving and globalised world led to the developement of portable travel guitars. Especially in the case of totally silent instruments, the lack of guitar body with the usual dimensions prohibited guitarists from performing flamenco golpes or other percussive techniques.
To address this issue MOOV Guitars developed a new form of golpeador, made from plexiglass which extends the guitar’s virtual soundboard, without visually distracting from the minimal character of its design, and allowing guitarists to perform like they would on a normal guitar.


The influence of the golpeador on a guitar’s sound
Nowadays, the most common form of golpeador is a thin self adhesive transparent plastic film which is visually unobtrusive and minimizes the dampening effects on the guitar soundboard of the heavier golpeadors.
Let’s not forget that the area around the bridge is very active acoustically and any protective plate unavoidably affects the tone and volume of a guitar.
There is a variety of golpeadores made from different materials and of varying thickness. One has to find out which one of them protects the guitar satisfactorily, while at the same time minimising any negative effects on the sound of the instrument.
Below follows a basic guide for the installation of the self adhesive golpeador for classical, flamenco and for the brave among us acoustic guitars.
How to install the golpeador – step by step instructions
- Loosen and untie the guitar strings from the head. There is no need to remove the strings from the bridge.
- Make sure the soundboard is clean from grease or dust. The use of any solvent is not advisable as there is always a chance of damaging the finish. Shellac (french polish) is particularly sensitive.
- Place the golpeador on the soundboard without removing the protective foil. The side of the foil should be facing down.
- With the use of masking tape center the golpeador relative to the bridge. It is advisable to leave some space (a couple of mm) from the bridge as this region is usually not flat due to lacquer accumulation. It is important to use a small piece of masking tape for the gap otherwise the golpeador will not fit properly near the rosette.
- With the marker and using a ruler, outline the length of the golpeador just at the middle of the soundhole.
- Mark the perimeter of the rosette nearest to the sound hole. After the edge of the rosette there is a slope on the soundboard and it would be impossible to glue the golpeador.
- As an optional step, you could round the corners of the golpeador for a more refined look. Using a small round object, like a glass, mark the outter corners on the sound hole side. You could follow the same process but using a smaller object like a coin for the corners near the bridge.
- Now we are ready to give the proper shape to our golpeador. On a hard surface, mark the soundhole cut out (which was previously drawn with our marker) using a divider or compass. By scratching the golpeador with a divider it will be easier to cut later. For cutting you can use round nail clippers or a pair of scissors.
- Using the ruler and a scalpel (for a smooth edge) or a pair of scissors cut the golpeador lengthwise following the line you drew earlier. You can now cut out the corners if that is your preference using either a pair of scissors or an exacto knife.
- Optionally, you could very carefully sand the edges of the golpeador. Take care so that any small particle does not end on the adhesive side.
- You can now glue the golpeador on the sound board. Please be patient. The installation must be done in one go. At this point, if anything goes wrong, it is very difficult to correct any mistakes without leaving bubbles or bright spots under the golpeador. Try to never touch the sticky part of the golpeador with your fingers. Start by peeling the protection foil from the bridge area of the golpeador exposing just a small part of the sticky surface. Now, lay down the golpeador and make sure it is properly aligned relative to the bridge.
- You can now glue the golpeador starting from the bridge. Remember, the protection foil is still partly on. With the use of a small plastic spatula or a flat object wrapped in cloth gently press on the golpeador starting from the bridge to remove any air bubbles or bright areas. Little by little, work towards the sound hole exposing only a couple of centimeters each time. With this method (the same method we use when putting a protective film on a smartphone) it is possible to glue the golpeador without any air bubbles.
- If there are any air bubbles left, try chasing them towards the periphery of the golpeador with a credit card.
- Any very small bubbles of 1 to 2 mm that cannot be moved will probably disappear by pressing them from time to time.
When the time arrives to remove a damaged golpeador, you could try heating the protective film with a hair dryer in order to soften the glue. Using this method, the golpeador removal would be both easier and safer for the guitar’s finish.
We hope you found our article useful and enjoyable. Please, share your experience and knowledge or any questions regarding the golpeador on the comments section below.
We would love hearing from you!
MOOV Guitars